Being that it is currently a weekend, I have some spare time to release another update. Mainly, this update adds support for more Mega CD disc rip formats, but there is another improvement that I wanted to highlight as well:
Fix Window Icon Blurriness on High-DPI Displays
A user shared this screenshot of the emulator in a GitHub Issue:
This desktop is running at an extremely high resolution, which is made evident by the high-resolution font rendering. However, when looking at the very top-left of the screenshot, something odd can be seen…
Right next to the crisp, high-resolution font is an awfully blurry, low-resolution icon. I found this to be very strange, as the icon which I made for the emulator supported resolutions up to 1024×1024, and yet here the window is clearly using the 16×16 version of the icon.
I eventually found that setting the icon of the window is the responsibility of the SDL2 library, and that it was using a peculiar method of extracting “default” icons from the running executable: it would obtain the full path to the executable, use the ExtractIconEx WinAPI function to extract specific large and small icons from it, and then assign those to the window. I found this odd because it seemed unnecessary to obtain the path to the current executable when SDL already has a handle to the executable. Additionally, WinAPI provides functions to obtain icons from the current executable by loading them as resources, which, to my understanding, is the standard method which the majority of people use.
Icons can exist on their own or in a group. It appears that ExtractIconEx returns lone icons rather than icon groups, and that the icons which it returns are not the ideal resolution for high-DPI displays. Windows relies on icon groups in order to support high-DPI displays, selecting the icon with the appropriate resolution from the icon group to be shown. Because ExtractIconEx was not returning an icon group, Windows was unable to do this, resulting in the 16×16 icon being used at all times.
SDL2 has a ‘hints’ system, allowing some degree of configuration. With it, I can force the window to use a particular icon or icon group, instead of relying on SDL2 to choose one automatically. Indeed, doing this fixes the issue, causing an icon with a decent resolution to be shown instead:
But this was not good enough for me: why should I, and every other user of SDL2, have to set a hint to make SDL2 use the correct icon resolution? SDL2 should get it correct by default! So, I took it upon myself to fix SDL2. According to this StackOverflow answer, in situations where Windows itself has to assume an executable’s icon (such as when viewing it in File Explorer), it uses the first icon group within it. Using WinAPI’s EnumResourceNames function, I made SDL2 do just this. As I had hoped, this fixed the issue completely, ensuring that the best icon resolution is always used!
With my work done, I submitted it as a Pull Request to SDL2’s GitHub repository, and it was promptly merged! When SDL2 v2.30.3 or v2.32.0 is released, expect to see this bugfix included as a part of it! This improvement also benefits the upcoming SDL3, which boasts improved high-DPI support as one of its main features!
Support Many More Mega CD Disc Rip Formats
v0.7 only supported rips in the ‘BIN+CUE’ format. This is a basic format where the BIN file contains a dump of the disc’s sectors, and the CUE file contains a transcription of the disc’s Table of Contents. While this format does well to preserve data accurately, it uses a lot of space due to two things: 13% of the CD-ROM data being useless junk data, and the CD-DA audio being uncompressed PCM.
To address this, other formats exist, such as ‘ISO+OGG+CUE’. In this format, the CD-ROM data is moved to its own ISO file with the junk data removed, and the CD-DA audio is also split to its own files and encoded in the Ogg Vorbis format. This greatly reduces the size of the rip: for example, the Japanese version of Sonic CD is reduced from 556MiB to 126MiB.
The downside to such a format is complexity: the rip is no longer a straightforward dump of raw, uncompressed sectors, with each one being exactly 2352 bytes; now, CD-ROM data is in sectors that are 2048 bytes in size, while CD-DA audio is encoded and lacks the notion of sectors altogether. The encoding in particular is a massive complexity, as formats such as Ogg Vorbis are extremely complicated and not very feasible to create a new decoder from scratch for, necessitating the use of pre-existing software libraries instead.
It is with such libraries that I have extended my emulator to support additional formats! In particular, stb_vorbis, dr_flac, dr_mp3, and dr_wav are used to support Ogg Vorbis, FLAC, MP3, and WAV audio! This should encompass the majority of formats commonly used by Mega CD rips. What is special about the libraries which I have chosen is that they minimise the concerns about portability and licensing, due to them being written in ANSI C and released under extremely-permissive licenses.
Another format that is now supported is the ‘CUE-less’ rip: in this format, there are only ISO and audio files, and no CUE file. With no CUE file linking them all together, these files are instead linked through their naming: the ISO file is named ‘XXXX.iso’, and the audio tracks are named ‘XXXX 02.ogg’, ‘XXXX 03.ogg’, etc. If the user makes the emulator load the ISO, then the emulator will automatically search for the audio files and load them too.
The ‘CUE-less’ rip in particular is the best format for homebrew developers, as they do not have to maintain a big fragile CUE file, nor do they have to go through the rigmarole of inserting junk data into their ISO file, decoding their audio to raw PCM, and combining it all into a gigantic BIN file.
With these formats supported, archivists, homebrew developers, and typical end-users alike are all catered to!
There is one format that still needs to be added, however: CHD. This is a format from MAME, which encodes the audio in FLAC, compresses the ISO in one of several compression schemes, and combines it all into a single file. This format has found popularity relatively recently, being added to many emulators under the RetroArch umbrella. It walks the line between targeting end-users and archivists, as it preserves the original data while still saving space through the use of compression. Unfortunately, the library which is used to decode CHD files is woefully undocumented, preventing me from integrating it into my emulator. I hope to eventually figure out how to use this library so that every common rip format is supported.
Closing
With this, the biggest shortcoming of the previous update has been addressed. The emulator should now be well-rounded enough to last people until the next update. I wonder what I will work on next?
It is finally here! With my job resuming tomorrow, I decided that I should release what has been completed so far before I have far less spare time. The main feature of this update is greatly-improved Mega CD support, allowing Sonic CD to be played from beginning to end. But that is not all: there are also bugfixes, improvements to accuracy and user-friendliness, and the emulation of even more Mega Drive features!
Fixes for After Burner II and Jim Power
As covered in a previous blog post, compatibility with two games has been improved by correctly emulating two quirks – one in the 68000 CPU and one in the SN76496 sound chip.
Use Software’s Name as the Window Title
Unlike other emulator developers, I see my emulator as less of a Mega Drive simulator and more of a Mega Drive compatibility layer. With that in mind, the frontend should provide as ‘thin’ a layer between the running software and the user as possible. One area where this was not the case was the window title: if the user was playing Sonic the Hedgehog, then the window’s title should be ‘Sonic the Hedgehog’, but, instead, it would always be ‘clownmdemu’. That issue has now been fixed.
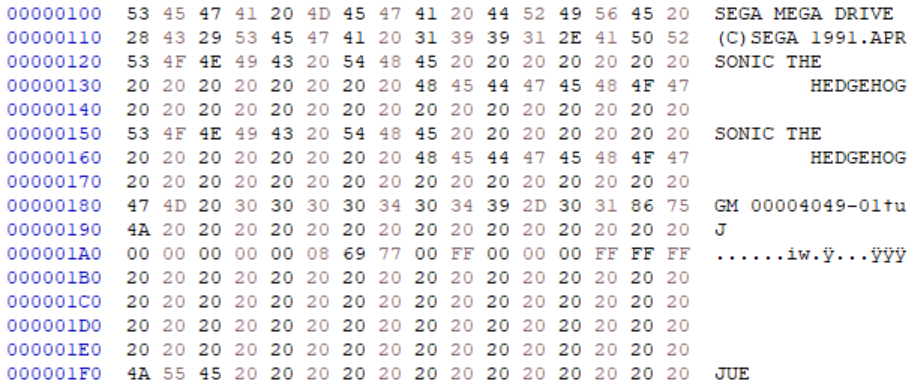
How does the emulator know what the software’s name is? Sega required that software made for the Mega Drive have a header, and this header includes a name. Here is the header for Sonic the Hedgehog:
The header includes many things: the target console, a copyright notice, the software’s unique serial code, revision number, a checksum, compatible accessories, ROM size, RAM usage, regions, and two names. One name is for Japan, and the other is for everywhere else. The emulator will display the name that matches the region that the emulator has been set to.
Notably, the names are encoded in SHIFT-JIS rather than ASCII, allowing them to contain Japanese!
Columns‘ header seemingly contains gibberish…
…until you decode it as SHIFT-JIS!
This feature was slightly awkward to implement: while the names are SHIFT-JIS, the window title must be UTF-8, so the names have to be converted. SDL2 has built-in text encoding conversion, but it does not support SHIFT-JIS, so the emulator has to perform this conversion on its own. Fortunately, I had already tackled SHIFT-JIS-to-Unicode conversion before for the CSE2 project, so I could just copy the code which I had written for that. That code would output UTF-32, however, so I needed to write an additional converter to turn UTF-32 into UTF-8.
With all that done, users can now see the name of the game that they are playing!
Implement the V Part of the H/V Counter
I dread implementing the H/V counter, as it is a hardware feature which I am very unfamiliar with, which does not seem to be particularly well-documented, and which would require significant refactoring in order to be emulated ‘properly’.
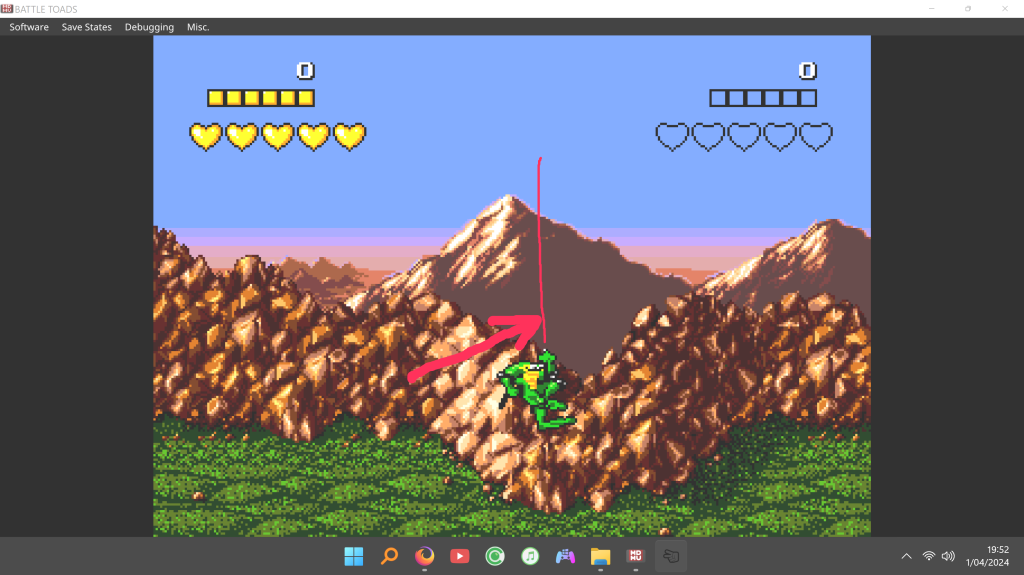
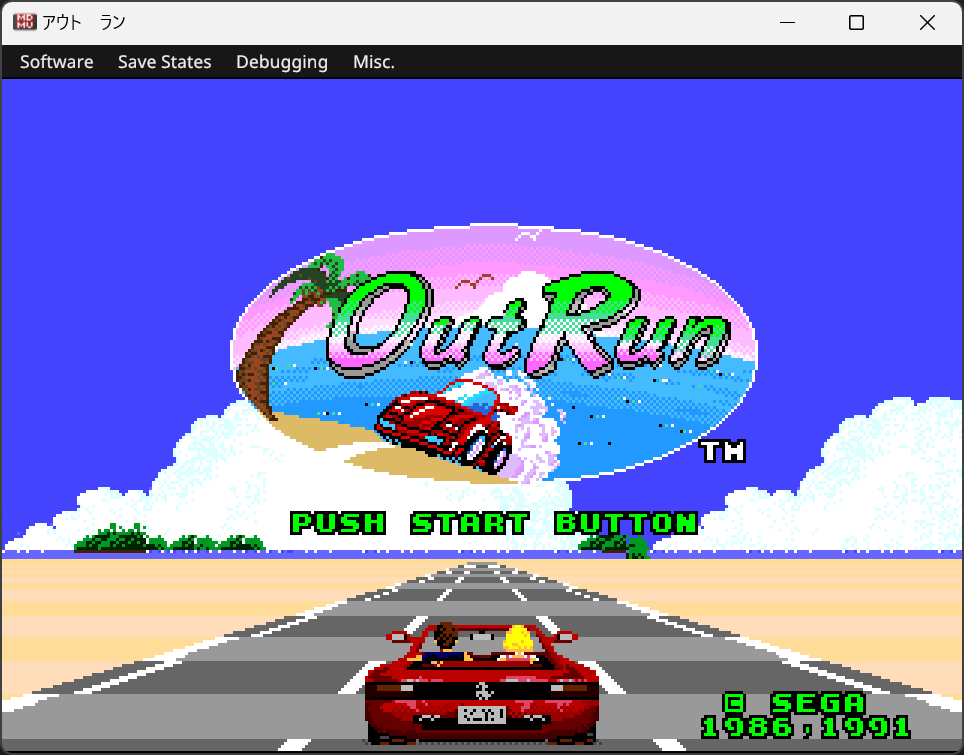
The H/V counter is a value that the 68000 CPU can read from the VDP to tell which pair of pixels (or a ‘slot’) it is currently (or would be) drawing. My VDP emulator currently draws in increments of entire scanlines instead of slots, so the H counter would be awkward to implement. However, the V counter would be simple to emulate, albeit inaccurately (the real V counter continues counting upwards even after the last scanline has been drawn).
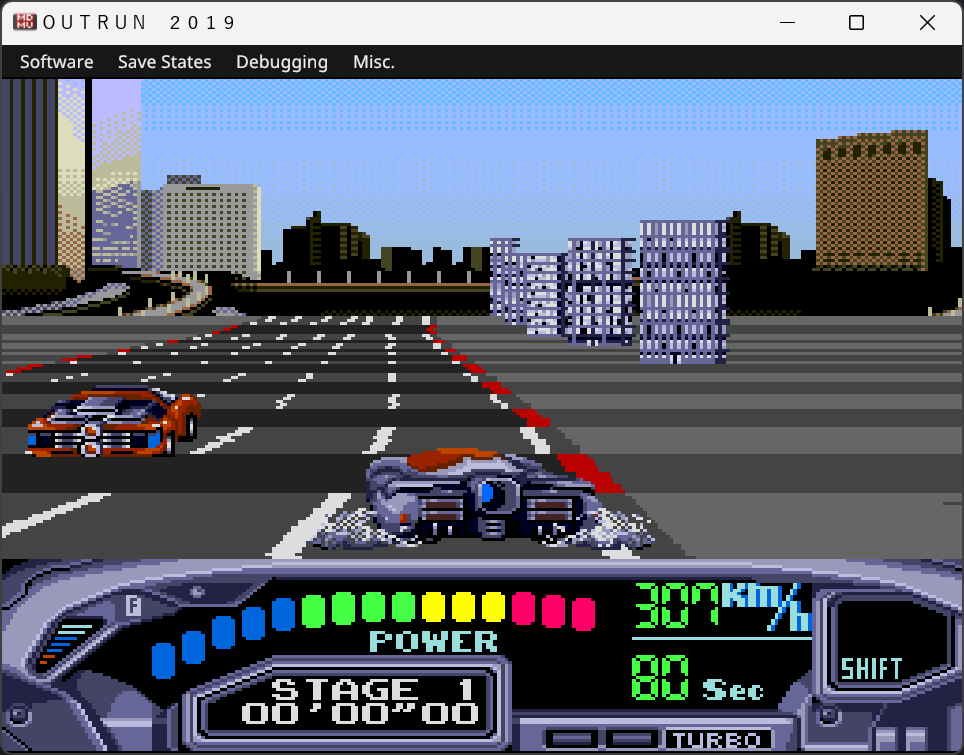
Implementing this fixed issues in multiple games:
OutRun‘s road not looking quite right.OutRun 2019 missing part of its HUD.
I would have implemented this long ago had I known that I had not already done so. It was such a simple feature that I thought I implemented it back when I first wrote the VDP emulator, but I had not. Silly me.
Vastly-Improved Mega CD Support
For the first time, this project has received improvements from another developer! Devon has recently been learning the inner-workings of the Mega CD, and applied that knowledge to improving this emulator!
Fixes and Accuracy Improvements
It began with fleshing-out the stub LLE BIOS to handle level-2 interrupts and implementing a few stubs for the Mega CD’s graphical capabilities. What sounds like relatively-unimportant busywork actually made a significant difference: with these changes alone, Sonic CD was finally able to progress past its title screen and into gameplay!
From analysing the game with my 68000 disassembler, I knew that the freeze on the title screen was caused by the game waiting for an interrupt to occur, but I did not expect that interrupt to be related to graphical operations of all things! After all, the title screen itself was running just fine, despite its use of that fancy cloud effect.
But this was just the beginning! Additional fixes rolled-in to properly-support the Mega CD’s horizontal interrupt setting, allowing the game’s water levels to run without crashing!
Curiously, this feature suggests that the Mega CD’s bus has a nasty hack in it to allow two specific bytes of the BIOS ROM’s vector table to be overwritten. It may not be pretty, but it works.
Also, a bug within the Mega CD hardware was emulated, allowing the game’s FMVs to look correct:
The way that this bug works is that DMA transfers which are performed from the Mega CD’s Word-RAM suffer from a delay, causing all transferred data to be offset by one word. This is simple to emulate in the bus logic, just like the aforementioned horizontal interrupt override.
New BIOS
Along with these fixes came a whole new stub BIOS! Courtesy of Devon, this BIOS has been created by reverse-engineering the original Sega BIOS, accurately implementing a wealth of features! At the point, calling it a ‘stub’ BIOS might seem a bit harder to justify given how much more complex it is, but this new BIOS does not replace the high-level emulation that already exists. Like the original stub BIOS, this new BIOS merely handles tasks which would have been cumbersome to emulate in a high-level manner, such as invoking the Sub-68000 program and handling interrupts.
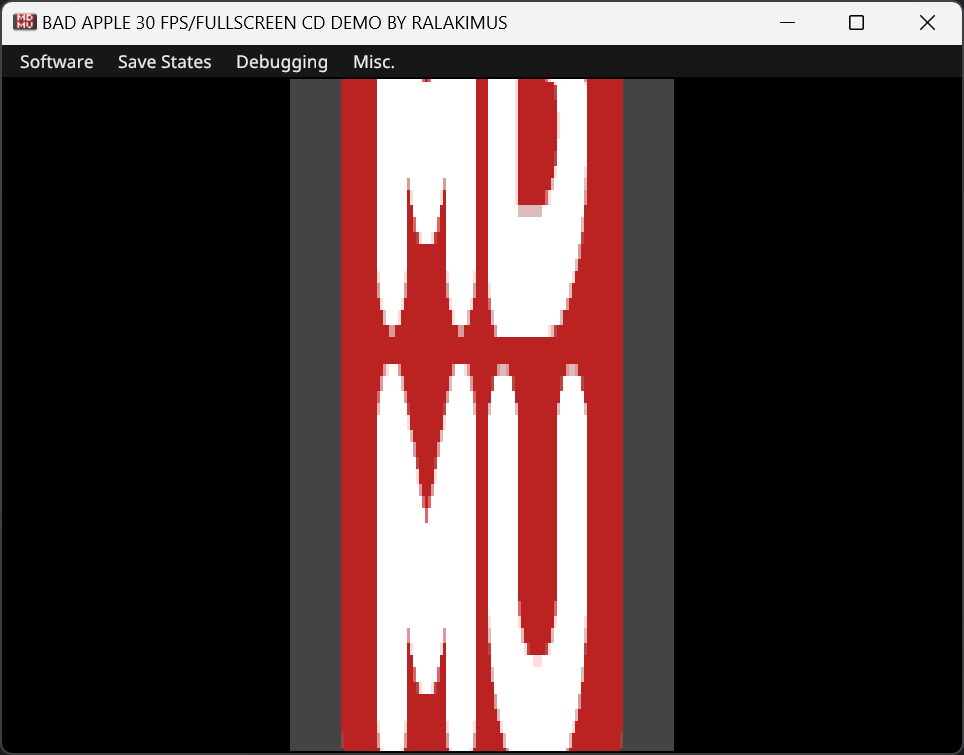
Devon was particularly concerned with compatibility when creating this BIOS. Because of this, the BIOS also supports briefly displaying a splash-screen on boot:
The original Mega CD BIOS features a well-known animation, showing the Sega logo. When this animation is complete, the BIOS does not unload its graphics. Because of this, software is able to use these graphics in various ways, such as in a transition effect or by using the font for displaying a menu. In order to allow these effects to be enjoyed, this splash-screen is needed.
Sonic Megamix applies the Sonic engine’s fade-out effect to the logo.CrazySonic humorously makes the logo mimic a reversing bus.The Bad Apple tech-demo stretches the logo.‘Sega Loader’ uses the font to display its menu.
Emulation of the RF5C164 PCM Chip
With Sonic CD being playable from beginning to end, the lack of emulation for various Mega CD components has become quite evident: the special stages lack their floor graphics, CD-DA music does not play, and PCM sounds are not audible. To begin addressing this, Devon and I have implemented PCM emulation!
The RF5C164 is pretty rudimentary: it has 8 channels which sample PCM audio from the chip’s dedicated RAM in a nearest-neighbour manner, and this sampled data is scaled by the channel’s volume and panning settings before being mixed with the other channels’ sample data. Compared to the YM2612, this is simple. There are still a number of edge-cases that need to be tested on real hardware, but otherwise this chip is now fully emulated.
Emulate Level-3 Sub-68000 Interrupt
Unfortunately, emulating the PCM chip alone was not enough to get Sonic CD’s PCM audio to play. This is because the game’s sound driver only runs in response to the level-3 interrupt of the Sub-68000 CPU. Without implementing this timer, you get no PCM audio at all. Without implementing this timer correctly, you get this:
I expected this timer to be difficult to implement, due to how concurrency of emulated components works in my emulator, but it proved to be fairly easy. With this, Sonic CD’s PCM audio finally worked… mostly.
The reason for the speed being wrong was that the Mega CD has its own master clock, which differs from the one in the Mega Drive (50MHz instead of 52MHz). The emulator was not designed with multiple master clocks in mind, so Mega CD emulation was using the Mega Drive clock instead.
After some refactoring and many headaches, support for multiple master clocks was added and PCM audio finally sounded correct!
But there was still more to do: PCM is just one of two extra forms of audio that the Mega CD adds!
Emulation of CD-DA Playback
The PCM chip works by playing and mixing individual audio samples in real-time. This is old-fashioned, working somewhat like a MIDI file. On the other hand, CD-DA (Compact Disc – Digital Audio) is much more modern: it is a direct recording of music, just like an MP3 or WAV file. This frees the music from limitations such as the number of channels, juggling usage of channels with SFX, and ensuring that samples fit within a buffer. The downside to CD-DA music is that it is massive: Sonic CD‘s Palmtree Panic Present music is around 15MiB, which is 30 times larger than the entirety of Sonic 1!
Sonic CD uses both PCM and CD-DA forms of music: using PCM for the music of the ‘past’ levels, and CD-DA for the music of the ‘present’ and ‘future’ stages. If I wanted Sonic CD to be fully emulated, I needed to implement both of them.
CD-DA playback is a relatively high-level feature of the Mega CD: software simply sends commands to the sub-68000 BIOS to seek to and play audio tracks, with the actual process of fetching, processing, and playing the audio being hidden completely behind the BIOS. Since the BIOS is emulated in a high-level manner, this leaves me free to implement CD-DA playback however I want, without worrying about low-level details such as emulating a CD drive’s controller chip.
CD-DA audio data is raw 16-bit stereo PCM, just like a typical WAV file. It is not stored in any compressed or encrypted form, allowing it to be read by simply copying data directly from the disc image. The emulator’s audio mixer just so happens to take 16-bit PCM as its native input format, making the process of “emulating” CD-DA as simple as a single file read operation.
At the moment, features such as fading, fast-forwarding, and reverse playback are not emulated, but what is currently implemented is enough for most uses.
The biggest problem with adding support for CD-DA playback was actually the file format used by Mega CD game rips: instead of everything being compacted into a single file, like a cartridge ROM, Mega CD games are split to at least two files – a BIN file and a CUE file. The BIN file contains a raw dump of all of the CD’s sectors, while the CUE file contains a text-based expression of the CD’s Table of Contents. The CUE file format is strangely lacking in a concrete specification, requires slow and complicated text processing logic, and also outright requires the use of file IO. That last point especially is a huge problem, as the Emscripten port of the emulator is unable to use file IO due to running in a sandbox. This would not be a problem if both files were simply combined into one.
Another issue with CUE files is that it is possible for the audio tracks to be extracted from the BIN file and be stored as their own standalone files. These files can be encoded in the WAV format, Ogg Vorbis format, MP3 format, etc. This creates a huge burden for the emulator, as it needs to support every feasible audio format in order to support as many types of Mega CD disc rip as possible. This requires pulling in numerous audio libraries like libvorbis and minimp3, each one bringing its own licensing terms, executable bloat, and portability concerns.
In recent years, a new format has emerged: MAME’s ‘CHD’ format. This format combines everything into a single file, while applying lossless compression to reduce its gargantuan size. Unfortunately, the other problems that I listed above apply to this format at well: being such an elaborate format, and leveraging multiple forms of compression, numerous libraries are required in order to decode CHD files. Given that clownmdemu’s core is written in portable ANSI C while libchdr and zstd are not written portably at all, I really, really do not want to use them.
For now, the emulator supports the ‘BIN+CUE’ format. This still requires file IO which will prevent it from working in the Emscripten port, but it at least does not require additional libraries.
To help with supporting the wide variety of CD formats, I have split the emulator’s CD code off to its own library – clowncd. This can be used for more than just emulation, as shown by its test program, which can extract ISO and WAV files from a BIN+CUE rip.
6-Button Controller Support
Up until this point, the only type of controller that was emulated was the original 3-button controller. The emulator has now been extended to support the later 6-button controller, allowing software which supports it to be used with a more natural control scheme. Some games have cheat codes that are only possible to input with a 6-button controller.
This controller was considerably more complicated to support than the 3-button controller, due to it internally featuring both a counter and a timer that managed which buttons could be read by the Mega Drive at once. This is because the 9-pin port that the controller is plugged into is not enough to expose all of the button data at a single time. This was already a problem for the 3-button controller, which was solved by splitting the buttons into two groups and using one of the pins to select which group to be read with the other pins. The 6-button controller extended this, exposing the additional buttons after the ‘select’ pin has been strobed a certain number of times, and resetting this number after some time has passed. Emulating this required making the controller emulation logic able to measure time, similar to the CPU emulation logic.
Add Per-Operator Frequencies and CSM Mode to the YM2612 Emulation
The YM2612 has a strange feature, where the third channel can use four different frequencies instead of one. This feature is heavily used by Streets of Rage. A related feature is the so-called “composite sine mode” (CSM), which triggers a ‘key-on’ and ‘key-off’ of the third channel when Timer A expires. According to Chilly Willy, this feature is intended for speech synthesis, but no official Mega Drive games appear to use it.
When I created the YM2612 emulator, I did so in a very object oriented manner: the FM chip as a whole was an object, which contained 6 channel objects, which contained 4 operator objects, which contained a phase generator object and an envelope generator object. This was somewhat overkill, as such heavy encapsulation meant that objects did not share state, even if the components of a YM2612 actually did. Ironically, this actually worked in my favour, as it meant that each operator already had its own frequency, albeit one that was always set to the same value as the channel’s other operators. So, to add support for the third channel’s per-operator frequency mode, all I had to do was allow each operator to be assigned a unique frequency.
In the future, I hope to refactor the YM2612 emulator to be less encapsulated, allowing for the elimination of redundant duplicate state.
CSM was comparatively simple to emulate, however it is not entirely accurate. All that is needed is to call the key-on function twice when Timer A expires – one to turn it on, and the other to turn it off. A real YM2612 merely queues these operations, and performs them during the envelope generator update process. This delay could have side-effects which are not currently recreated in my emulator.
Implementing both of these features allows Nemesis’s CSM test ROM and Streets of Rage to work correctly.
Add SSG-EG Emulation
SSG-EG is yet another curious feature of the YM2612. I was able to implement it rather painlessly thanks to Nemesis’s wonderfuldocumentation. The way that it works is that it builds upon the YM2612’s ADSR envelope generator, allowing the envelope to be played repeatedly, optionally with mirroring, inversion of the envelope’s attenuation, and with the option of having the envelope hold its final value when it ends. It is a bit of an esoteric feature, but many official games do use it.
A couple of games (an Olympics game and a Beavis and Butthead game) use SSG-EG in a way that is officially undefined, causing the YM2612 to behave in a buggy manner. In order for these games to produce audio correctly, SSG-EG must be implemented in a way that is as close to a real YM2612 as possible. Fortunately for me, this is exactly what Nemesis’s documentation helps to achieve.
SSG-EG is actually a leftover feature from the YM2612’s predecessor, the YM2608. In that chip, there was a “software-controlled sound generator” (SSG) module alongside the FM module. The YM2612 only contains the FM module, but since SSG-EG was part of the FM module and not the SSG module, it is present nonetheless. The SSG module and SSG-EG were necessary for providing compatibility with the AY-3-8910.
Fix Sonic 3‘s Competition Menu Music and Contra: Hard Corps‘ Snare
Ever since YM2612 emulation was first added to this emulator, one of the instruments in Sonic 3‘s Competition menu music was really loud. This was the only FM audio issue that I knew of which was caused by an actual bug rather than just a missing feature. That changed when BlastBrothers put together this huge list of audio issues, ranging from missing features to new bugs. In particular, Contra: Hard Corps has an FM snare drum that was playing completely differently to how it does on a real Mega Drive. I figured that, by fixing the underlying bug which was causing one of the inaccuracies, there was a chance that it would also correct the other inaccuracy.
To debug this, I began modifying the Sonic 3 disassembly to produce a ROM with a slightly different instrument, altering various settings within the instrument until the ROM sounded identically in both my emulator and a real Mega Drive. Eventually I discovered multiple ways to make the two sound the same:
Change the sustain rate to 0 to match the decay rate.
Change the decay rate from 0 to match the sustain rate.
Change the sustain level from 0 to any other value.
The decay rate and sustain rate are two variables which control the ADSR envelope. The sustain level controls when the envelope switches from using the decay rate to using the sustain rate. These three modifications suggested that there was something wrong with how the sustain level was being used: since the instrument has a sustain level of 0, the sustain rate should be switched to immediately, leaving the decay rate unused, and yet the instrument would sound wrong in my emulator unless the decay rate matched the sustain rate. This meant that the emulator was using the decay rate when it should not be.
After some trial-and-error, I found the cause of the bug: the documentation which I had used to develop the YM2612 emulator was wrong!
As described in a previous blog post, I relied heavily on Nemesis’s documentation when creating the FM emulation. This documentation claims that the envelope generator is not updated on every sample; instead, it is updated every several cycles, depending on what the current rate is. Here is the pseudocode that was provided to illustrate this:
++globalCycleCounter
For each operator
    //Read the shift value from Table 1
    counterShiftValue = counterShiftTable[operator.rate]
    If (globalCycleCounter % (1 << counterShiftValue)) == 0
        //Check the current cycle we're up to (0-7)
        updateCycle = (globalCycleCounter >> counterShiftValue) & 0x07

        //Read the next attenuation increment value from Table 2
        attenuationIncrement = attenuationIncrementTable[operator.rate][updateCycle]

        //Update the attenuation
        //The attenuation update process happens here. More on that in the next section.
    Endif
Next operator
Because my emulator does just this, there is a large period of time before the emulator checks the sustain level and switches from the decay rate to the sustain rate. In reality, the YM2612 updates the envelope generator on every sample, and the current rate simply affects how much the envelope is progressed. This can be proven by examining Nuked OPN2, which is a transcription of the YM2612’s circuitry to C.
With this problem solved, both games sound correct. Just as I had hoped, fixing one inaccuracy also fixed the other!
Perfect Frame Advance Rewinding
Because the rewinding feature predates the frame-advancing feature, the former was not designed with the latter in mind. As a result, when used together, they exhibited latency: when toggling between advancing forward and advancing backward, it would take multiple frames for the change to actually take effect. There was also an additional problem where, when advancing backwards for the first time, it would not advance at all, merely duplicating the previous frame. The cause of this had to do with how the rewind feature’s ring buffer worked; particularly how it was read from and when it was updated. By adjusting these details, the latency is eliminated, making frame advance rewinding work perfectly!
Closing
So, here it is – one giant update. As always, there is plenty of work left to be done, but hopefully what is here already is enough to be useful.
One of the Citra Progress Report writers has a blog, on which he posted this commentary on open-source emulation. The blog post goes over the clashes between users and developers throughout the history of the late Citra emulator, and how closed-source development should be used to prevent users from making forks.
Early in Citra’s development, many high-profile games were not able to run. Given that Citra was designed for running Nintendo 3DS games, this was a big problem for users and developers alike. Naturally, there was tension between the two parties, and many users produced forks of Citra that introduced ‘hacks’ to the emulator to make certain games work. Another thing that forks would do is include and enable unfinished features that were not available in the upstream version of the emulator. These features could improve the emulator’s compatibility (allowing more games to work correctly) or they could provide enhancements (such as by enabling high-definition rendering and the use of texture packs). Some of these forks would cost a fee to obtain, others violated Citra’s copyleft software licence by not providing source code, and some even bundled malware.
The writer claims that all of this somehow harms the upstream developers. I do agree that licence violations and malware are bad, but users making their own forks? How much do you have to hate your own users to think that is a bad thing? The best that the writer can do to put this in a negative light is say that the forks would occasionally receive credit and praise for features that were actually created (but not enabled) by upstream developers, and that users felt that the maintainers of these forks cared more about them than the upstream developers did. Boo-hoo. And yet the writer argues that these problems alone could have ended 3DS emulation altogether by “wearing down” the developers. Because some users accidentally credited a feature to the fork that actually featured it. Because some users, who were not being prioritised, felt that they were not being prioritised. Really.
The writer then talks about the ups and downs of closed-source development, such as how it prevents “malicious”, “leeching” forks but does absolutely nothing to stop people from making “fake websites to siphon ad-revenue”. Not a word to be said about how it would kill off the non-“malicious” forks though. Funny, that. Not a word about how it would prevent users from accessing the source code, from making modifications, from improving the emulator, from contributing to the emulator.
Ironically, the post ends by saying that developers are people and that they deserve respect. The author forgets that users are people too and that they deserve respect. If they are unhappy with an emulator, they should be allowed to edit it, to fork it, to share their fork with others, and to use other people’s forks. Instead, the author sees fit to spout some of the most entitled control-freak drivel that I have ever seen in regards to emulation development: if you, a user, want to play a game in an emulator, but the developers refuse to make that game work because doing it the correct way is hard and doing it the easy way is incorrect, then you should not be able to play it. End of. You should not be allowed to spend your own time and effort hacking-up a copy of the source code, and neither should any other users. And why? Because the developers are butt-hurt about having their thunder stolen. Because of their ego. It is their way or the highway, and that is the respectful way that it aught to be.
Oh, wait, no it isn’t.
Here is a suggestion: if developers want praise, then they should do things that their users like; if developers do not care about their users, then they should not complain that their users are unhappy with them. If developers would actually release their features, instead of hoarding them for months on end while bragging about them in progress reports and on social media, and doing everything in their power to prevent forks from making them accessible, maybe then their users would not hate them.
I found myself itching for a fun project to work on, and my mind settled on updating Captain PlaneEd to use Dear ImGui instead of WinAPI. This allows the previously-Windows-only menu bar to work on Linux, macOS, and the BSDs too. Additionally, Linux and BSD users get to enjoy file dialogs. Much of this was done by just copying code from clownmdemu’s frontend.
Captain PlaneEd was an April Fools’ project of mine, back in 2016. It took the old (and somewhat infamous) PlaneEd and enhanced it. I mostly used it as an exercise in porting software from SDL1 to SDL2. I also utilised WinAPI to add a menu bar to it. Because it was WinAPI, it would not work on Linux and macOS and the like, so builds for those platforms remained menu bar-less. I suppose that it is fitting for this update to be yet another exercise in making technological improvements for the mere sake of it.
To get any game off a Nintendo Switch console and into the Yuzu environment to be played, therefore, Bunnei and other of Defendant’s agents must: [...] (2) make at least one unauthorized copy of a Nintendo Switch game, which, when the copied game is Nintendo’s, violates Plaintiff’s right of reproduction under the Copyright Act, 17 U.S.C. §§ 106, 501
Subject to sections 107 through 122, the owner of copyright under this title has the exclusive rights to do and to authorize any of the following:

(1) to reproduce the copyrighted work in copies or phonorecords;
This is, for lack of better words, bloody insane; apparently, you are not allowed to make a copy of a game that you own. Ever copied-and-pasted a game’s EXE? Well, I guess that makes you a criminal.
Surely there are other laws that contradict this, because this doesn’t reflect the status quo at all: people dump games, rip CDs, and photocopy books all the time and nobody cries injustice over it. The asinine claim of it victimising copyright holders would be nullified by a jury any day of the week.
On another note, the document is full of libellous nonsense:
In other words, the Yuzu developers brazenly acknowledge that using Yuzu necessitates hacking or breaking into a Nintendo Switch.
“Breaking into”. How does one ‘break into’ their own property? ‘Oh man, my iPhone is held together with glue. Guess I’ll have to break into it with a prying tool.’
You know, it would be nice to be a guy that buys video games, plays them on whatever platform he chooses, and develops his own emulator, without the constant threat of being branded a criminal for it. I have rights too, dammit.
BlastBrothers is back at it again with the bug-hunting, so here are some more fixes!
Fix After Burner II‘s Audio
After Burner II is fascinating: it plays PCM samples using the PSG channels, rather than the DAC channel. Because there is only one DAC channel, but multiple PSG channels, this allows the game to play multiple PCM samples at once, which is something that is not possible to do otherwise without mixing samples on one of the CPUs!
However, the game was failing to output any PCM samples in my emulator. Using the debugger, it could be seen that the PSG was indeed being used to play PCM samples, but it just was not audible.
Fortunately, I had a suspicion about what the problem could be: the documentation that I had used when creating my PSG emulator mentioned that, at a low-enough frequency countdown setting, the square wave ceases to alternate. I found this to be questionable, so I did not implement it in my emulator. However, the PSG would be outputting such a high frequency at this setting that it would be not only imperceivable to human hearing, but filtered-out entirely by the audio resampler. So, I did as the documentation said, and stopped the wave from alternating. And, with that, After Burner II‘s samples became audible!
Fix Jim Power‘s Flipped Graphics
While investigating another inaccuracy, I stumbled upon this bizarre bug:
After having made so many improvements to VDP communication lately, I was baffled to see yet another problem with it crop-up. It appeared that each longword of data that was being written to the VDP’s plane maps had its words reversed. After some testing, I concluded that this was not a problem with DMA transfers nor VRAM byte-swapping, so I began tracing longword-sized writes from the 68000 to the VDP’s ports. Upon detecting one, I used the emulator’s disassembler to view the code that performed it, and this is what I found:
Upon seeing this, I knew exactly what the problem was: the game was using a pre-decrement longword write, and it expected each word to be written in reverse order. In other words, it expects the latter word to be written to the VDP first, and then the former word afterwards.
While it was a bit of a pain to make my 68000 interpreter recreate this behaviour, I soon had it done, and I could enjoy Jim Power‘s hypnotic parallax scrolling bug-free!
Seriously, try moving to the right in this game – it gets weird.
I found myself working on my Doom source-port again lately, and I made some significant improvements, so here is an update. It can be downloaded in the usual place.
Added Widescreen Support
Yes, the engine already kind of supported widescreen, but it did so in a poor way: the wider the screen got, the more zoomed-in the view would get. This is because the engine uses a horizontal field-of-view rather than a vertical one. While it is not feasible to convert the game to a vertical FoV, the same effect can be achieved by simply scaling the horizontal FoV as the screen is widened.
Made Resolution and HUD Scale Configurable
In v1.0, the resolution and HUD scaling were hardcoded. This is because that is how they are in the original source code: they were both implemented as preprocessor constants, meaning that they were baked directly into the code, preventing them from being configured after the executable is built.
To change this, they were converted to variables instead. However, this presented a problem: the resolution values were used to define the sizes of arrays, but variables cannot be used for this, as array sizes too are baked into the executable at build-time. The solution to this was to add preprocessor constants for the maximum supported resolution, and make the arrays use those instead. For now, the maximum resolution is 4K.
With that done, the resolution and HUD scale can freely be changed. I have added some new options to the configuration file for doing just this.
Closing
So, there you have it – a short-and-sweet update! At this point, it is hard to believe that this is still the original engine: it has high-definition rendering, full-colour rendering, and now widescreen! All that is left to add now is an increased framerate.
Recently, I have been informed of various games that do not work correctly in my emulator by BlastBrothers, who has opened several issues on the emulator’s GitHub repository.
Properly Initialised Emulator State
One of these issues mentioned missing audio in Battletoads: upon booting, the title screen would not play any music. Despite this, music would play when starting a level, and the title would play music if the game were reset. These quirks suggested that this was a matter of the emulated Mega Drive having invalid state upon boot.
After some investigation, I found that the Z80’s bank was not being initialised at all. This caused it to default to the value of the memory that it occupied, which, on x86 Windows at least, is 0xCD. Because the Z80 bank was set to such an unusual value, the game’s sound driver was reading music data from the wrong location, causing no music to play.
Vastly-Improved VDP Command Behaviour
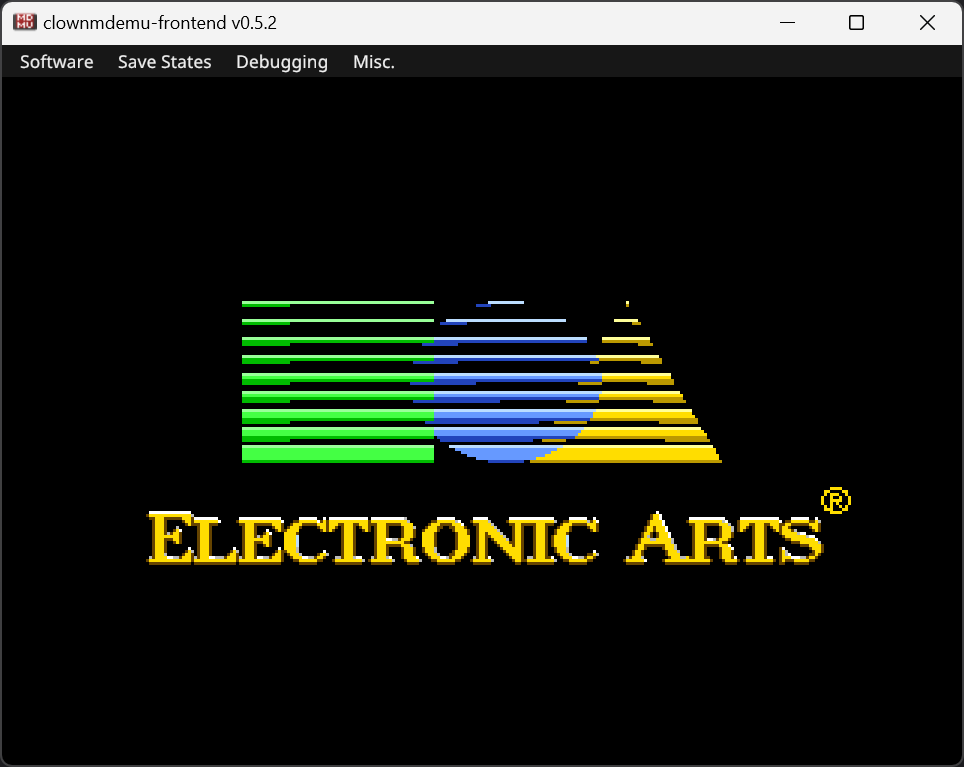
Another game that was misbehaving was The Adventures of Batman & Robin, which had missing and corrupt graphics in its opening:
Additionally, there were various Electronic Arts games whose EA splash screen did not appear correctly:
This looks pretty cool in motion.
What these both had in common was the debug log being flooded with warnings about invalid access modes and the VDP being written to while it was in read mode. It appeared that communications with the VDP were going horribly wrong. This struck me as very odd, considering that I had recently made VDP communication far more accurate in order to get Sonic Crackers working correctly.
To debug this, I consulted Nemesis’s VDP test suite (yes, the same Nemesis that the compression format is named after). His test suite is a ROM that you run on a Mega Drive emulator to verify the accuracy of various behaviours. Safe to say, my emulator does not pass many tests:
What was interesting was that the emulator did not pass the ‘partial command port writes’ test. I found this strange because I thought my emulator did support those: partial commands are cached and later combined with their missing halves when they are sent by the 68000. Is that not what a real VDP does?
As it turns out, no, it is not. As this incredibly useful document by Genesis Plus developer Charles MacDonald explains, the VDP actually applies partial commands immediately, and does not wait for their missing halves to arrive. This means that any software which relied on this behaviour was operating on outdated VDP state, as the commands that were being uploaded were not doing anything. I also found that my previous understanding of command latching was completely incorrect, and only worked in Sonic Crackers by complete accident.
After addressing these inaccuracies, the two games began looking much better!
This massive overhaul also incidentally fixed the stray pixels in Mega Man: The Wily Wars. It has been a long time coming!
Improved Accuracy of DMA Fill
Despite all of these improvements, Thunder Force IV continued to display garbage in its opening:
MacDonald’s document helpfully pointed out that this game required accurate DMA Fill emulation. DMA Fill is a feature that allows VRAM to be filled with a repeated value (though undocumented, CRAM and VSRAM can be filled as well). I thought that I had already implemented this accurately, yet, once again, it turns out that I had not. Oddly, when writing each byte, a real VDP does so to the current address XOR’d with 1. I do not understand why it does this. Regardless, my emulator failed to reproduce this behaviour, apparently causing the above bug. After applying a simple fix, the bug disappeared!
Made 68000 Byte Writes More Accurate
There was one small problem with the previous fix – it broke Wily Wars:
But how could this be? Even Nemesis’s test ROM confirmed that this was the correct way to emulate DMA Fill! After over an hour of debugging, my mind was not changed: my emulator was absolutely working correctly. So then why was this bug happening?
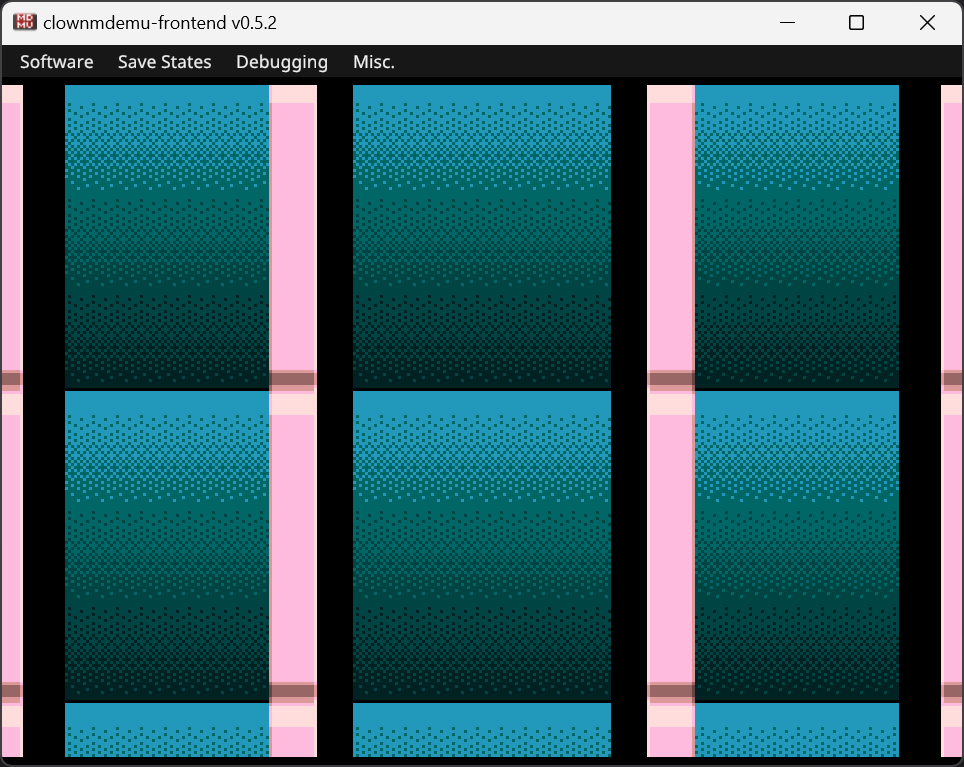
As a reminder: Wily Wars uses DMA Fill to create several blank tiles in VRAM. This is what they normally look like:
The problem is that the third and fourth pixels of each tile are not being set by the DMA Fill, causing a ‘hole’ to appear in them.
To explain why this could not be a problem with the DMA Fill itself, I shall go over how a DMA Fill occurs:
The final step of activating a DMA Fill is a standard memory write: this causes a word of data to be written to the destination memory at the current index, after which the index is incremented. Following this, the VDP enters a loop of writing the upper 8 bits of the word to the destination memory at the current index XOR’d with 1, until its counter reaches 0.
Let us illustrate this more directly; here is what happens when a DMA Fill of 0xFF is performed at index 0 with an increment of 1 and a length of 3:
Standard memory write occurs, writing 0xFF00 to address 0.
0xFF is written to address 0 (0 XOR 0).
0x00 is written to address 1 (0 XOR 1).
Index is incremented to 1.
Byte-writing loop begins:
0xFF is written to address 0 (1 XOR 1).
index is incremented to 2.
0xFF is written to address 3 (2 XOR 1).
index is incremented to 3.
0xFF is written to address 2 (3 XOR 1).
The result of all of this is that the four bytes starting at address 0 are ‘FF 00 FF FF’. Since a tile is 4-bits-per-pixel, this explains why the third and fourth pixels of each one is missing. The DMA Fill is working exactly as it should, so how does Wily Wars rewrite the skipped pixels, and why does it not work in my emulator?
To find this out, I used my emulator’s handy disassembler to view the code in the game that was triggering the DMA fill. Here it is:
What is most important is the ‘move.b 7(a0),-4(a1)’ instruction. This is the instruction which specifies the value to fill the RAM and ultimately triggers the DMA Fill. Normally, this instruction writes a word (‘move.w’), but this one moves only a byte (‘move.b’). As soon as I saw this, I knew exactly what the problem was.
While reading posts on the SpritesMind forum, I learned of a quirk of the 68000 that my emulator did not recreate: when performing byte-sized memory writes, the 68000 will repeat the byte in the top and bottom 8 bits of its external data bus. Since the VDP only supports word-sized port accesses, it will read both of these bytes together as a single word. This means that Wily Wars‘ code, rather than writing 0xFF00 to the VDP, is writing 0xFFFF.
Following the above steps again, but using 0xFFFF instead of 0xFF00, produces ‘FF FF FF FF’ rather than ‘FF 00 FF FF’. This is why Wily Wars does not have holes in its tiles on real Mega Drives.
Correcting this fixed Wily Wars once more!
Implemented DMA Copy
There is not much to say about this one: I do not know of a single game that uses DMA Copy, but Nemesis’s VDP test suite includes a few tests for it, so I figured that I would finally implement the feature.
DMA Copy copies bytes from one place in VRAM to another. It shares DMA Fill’s quirk of XOR-ing the destination address with 1, but DMA Copy also XORs its source address. Its other quirk is that it always increments its source address by 1, not by what the destination address increment register has been set to.
I was able to make this share most of its code with DMA Transfer, so these two features might share circuitry in a real VDP as well.
Made Debug Log and Disassembler Output Copyable
This is a small usability improvement to the frontend: the Debug Log and 68000 Disassembler windows now allow the user to select their text. In particular, this is for copying the text and pasting it elsewhere. For instance, the user could disassemble a function and then copy it into a text editor for further analysis or even to use it in their own project. Likewise, the debug log can be copied for pasting into a GitHub issue to report a bug.
Moved Configuration Files to Standard Location
The frontend has two configuration files, and, up until now, they have always been located in the ‘working directory’, which is usually where the executable itself is. If the emulator is ran via the command line, however, then the working directory will be whichever directory the command line is currently viewing. This can lead to configuration files cluttering various user directories without warning.
To solve this problem, configuration files are now stored in a standard per-user location. On Windows, this will be the ‘AppData’ folder, while, on Linux, it will be ‘.local/share’. As well as avoiding clutter, this has the added benefit of making all copies of the emulator share a single set of configuraion files. No more changing the keyboard bindings for the umpteenth time just because the EXE had been moved to another folder.
Improved Accuracy of Sprite Masking and Overflow
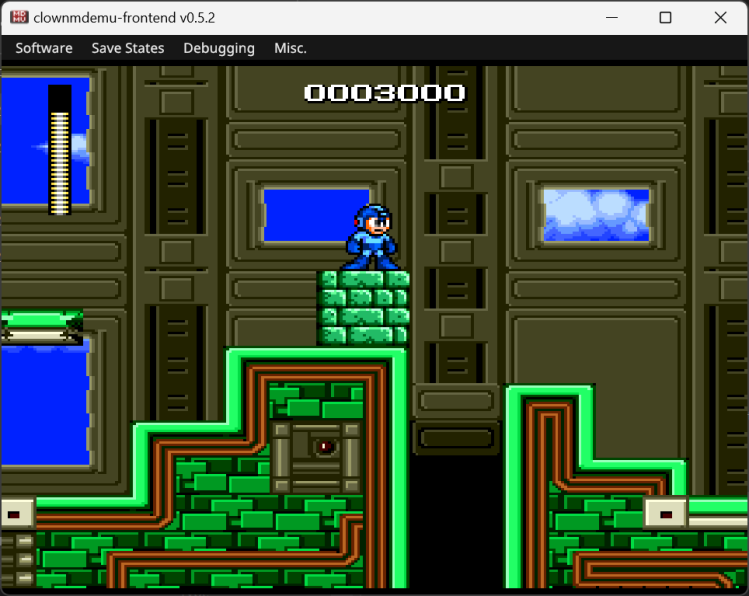
The Mega Drive has a limit to how many sprites it can render at once: there is a limit on how many sprites can be drawn across the whole screen, and there is a limit to how many sprites and pixels can be drawn on a single horizontal line. When this limit is reached, sprites simply stop being drawn. This can lead to graphics disappearing or flickering during heavy sprite usage, such as when defeating a boss in Sonic Spinball. One place that this can easily be seen is in Sonic the Hedgehog‘s Spring Yard Zone boss battle:
Here, the blocks along the bottom of the screen combined with the lives counter result in the pixel limit being reached, causing parts of the blocks to vanish.
The game’s title screen makes use of this to achieve a particular effect: numerous junk sprites are placed off-screen in order to reach the sprite limit, making the bottom of Sonic’s sprite disappear. If it were possible to see all of the sprites that the game is rendering, including the off-screen ones, here is what it would look like:
Were the sprite limit not emulated, the title screen would look very odd:
However, there is another way to hide parts of sprites like this: if a sprite has an X coordinate of 0 (which is very far off-screen to the left), then no more sprites will be rendered on the lines that it occupies. This type of sprite is known as a ‘sprite mask’. Sonic the Hedgehog 2 made use of this feature for its title screen, allowing it to achieve the same effect as its precursor without the need for so many junk sprites.
Sprite masking and the sprite/pixel limits have many edge-cases and little-known behaviours, meaning that many emulators do not emulate them accurately. To help make this a thing of the past, Nemesis created yet another small but exhaustive test suite.
I had actually used this to improve my emulator long ago, however there was a certain test that always failed:
This one had to do with a particularly odd edge-case within another edge-case: a sprite mask will not prevent sprites from being drawn if no other sprites have drawn before it unless the previous line reached its pixel limit. While this is simple enough to comprehend, I did not want to have to write a mess of spaghetti code to recreate the behaviour, so I left it unaddressed until I could come up with an elegant way to implement it. Fortunately, I finally came up with such a solution, and now all tests finally pass:
On another note – you might be wondering what I was using to see those offscreen sprites earlier. Well…
Added a Sprite Debugger
At long last, two years after adding debuggers for everything else, I have finally made a sprite debugger! In fact, I made two:
As seen in this image, one debugger lists each sprite in detail, while the other shows how the sprites are composed into the final image. Notably, sprites can be drawn far off-screen, and this debugger allows them to be seen! Additionally, with this, the Mega Drive’s rendering can be dissected down to each and every layer!
Wrapping Up
And that is everything of note in this update! Not since v0.4 has this emulator seen such a slew of fixes and features! Like with v0.4, development may slow down for a while after this, as writing such a big blog post and working on one project so much can cause quite a bit of burn-out. Hopefully this update is stable and user-friendly so that there is no huge need for another update any time soon.
While it was nice to create a compressor that surpassed Sega’s own, what I wanted more was to create a compressor that perfectly mimicked it.
When making a disassembly or decompilation of a game, assets should ideally be stored in a user-friendly format; the assets should be easy to view and easy to modify. However, often assets are left in their original compressed form. The reason for this is that the disassembly/decompilation is aiming to produce an exact copy of the game, down to matching binary, but a recompressed file would have different binary. By not decompressing the assets, the need for recompression is bypassed, avoiding this problem.
There are usually multiple ways to encode data in a given compression format. Some ways are better than others, such as by being faster to compress, faster to decompress, using the least RAM, or producing the smallest compressed data. Other ways aren’t necessarily better, but simply the result of the inner workings of the compressor, such as the order in which it does tasks, the sorting algorithm it uses, and even things as minute as whether it uses ‘<‘ or ‘<=’ to check the order of two integers. Because of this, it is unlikely for two compressors to produce the exact same compressed data.
When I was creating my Nemesis compressor, I was specifically aiming to mimic the behaviour, and thus output, of Sega’s compressor. I noticed early on that the code table was arranged first by order of the matching nybble run’s length and then by the value of the nybble itself, so I replicated that behaviour in my compressor. Later, I figured out that the codes were generated through Fano coding, so I implemented that too. But, even with the compressor complete, with both of these behaviours accounted for, the compressed output differed. Not long afterwards, I noticed that nybble runs with a length of less than 3 were never assigned a code, and mimicking this brought the data closer, but still without matching it exactly.
At this point, the differences in the data were quite subtle: the codes were the same, the size of the data was similar, the inlined data was the same, but the assignment of codes to nybble runs was different. The original compressor appeared to perform an optimisation that mine did not: it was somehow deviating from the usual Fano coding to assign the shorter codes to the most common nybble runs. The nature of Fano coding makes the occasional assignment of shorter codes to less common nybbles unavoidable, so I mistook this to mean that Sega’s compressor was not using Fano coding, and instead something more efficient like Huffman coding.
After implementing Huffman coding, I found that it was far less accurate than Fano coding ever was, so I switched focus to making Fano more optimal. Eventually I discovered that Sega’s compressor was not deviating from standard Fano coding, but rather it was performing some post-processing. In order to ensure that the most common nybble runs were assigned the shortest codes, it used a sorting algorithm to reassign the codes after Fano coding had already assigned them.
I also found that, unlike the code table, codes were assigned to nybble runs first in the order of run length and second in the order of the run nybble. Fixing this simply required swapping the order of two nested for-loops.
But, even with both of these implemented, the compressed data was still not exactly the same. While the shortest codes correctly mapped to the most common nybble runs, codes of the same size would be assigned to different nybble runs. The fact that differences in ordering only applied to codes of the same size suggested that this was a quirk of the compressor’s sorting algorithm.
Sorting algorithms can be divided into two groups: stable and unstable. Stable sorting algorithms will not change the order of values that are equal, whereas unstable algorithms might. My compressor was using a stable sorting algorithm, and so all codes with the same length were in the same order both before and after sorting. The output of Sega’s compressor having the codes in a different order meant that it must have used an unstable algorithm.
But how was I supposed to know which one it was? Every unstable sorting algorithm affects equal values in different ways, so I needed to make my compressor use the exact same one that Sega’s compressor used. I could have figured it out through trial-and-error, implementing each sorting algorithm and checking which one produced the correct output, but I did not want to do that as sorting algorithms can be very complex and hard to write. Instead, I figured that I would simply examine the data and figure out what sorting algorithm could create it.
Here are some codes generated by Sega’s compressor:
Code 1110110  encodes nybble A of length 2 and was seen 19 times.
Code 11101110 encodes nybble 0 of length 6 and was seen 18 times.
Code 11101111 encodes nybble 8 of length 3 and was seen 16 times.
Code 1111000  encodes nybble F of length 3 and was seen 19 times.
Code 11110010 encodes nybble 7 of length 3 and was seen 17 times.
Code 11110011 encodes nybble D of length 2 and was seen 16 times.
Code 1111010  encodes nybble 8 of length 5 and was seen 19 times.
And here are those same codes generated by my compressor:
Code 1110110  encodes nybble A of length 2 and was seen 19 times.
Code 11101110 encodes nybble 0 of length 6 and was seen 18 times.
Code 11101111 encodes nybble 7 of length 3 and was seen 17 times.
Code 1111000  encodes nybble F of length 3 and was seen 19 times.
Code 11110010 encodes nybble D of length 2 and was seen 16 times.
Code 11110011 encodes nybble 8 of length 3 and was seen 16 times.
Code 1111010  encodes nybble 8 of length 5 and was seen 19 times.
As expected, the shortest codes are assigned to the most common nybble runs, but the ordering of the 8-bit codes differ. Nybble runs 7-3, 8-3, and D-2 are in the wrong order.
Across a variety of compressed data, I noticed a pattern: the ordering of equal nybble runs would only ever differ if those nybble runs were sandwiched between codes of a shorter length. This suggested that the the reordering was a side-effect of moving a nybble run in order to sort it.
This is what the codes are before they are sorted:
Code 1110110  encodes nybble A of length 2 and was seen 19 times.
Code 11101110 encodes nybble F of length 3 and was seen 19 times.
Code 11101111 encodes nybble 8 of length 5 and was seen 19 times.
Code 1111000  encodes nybble 0 of length 6 and was seen 18 times.
Code 11110010 encodes nybble 7 of length 3 and was seen 17 times.
Code 11110011 encodes nybble D of length 2 and was seen 16 times.
Code 1111010  encodes nybble 8 of length 3 and was seen 16 times.
Sorting is needed so that the nybble runs F-3 and 8-5 are assigned to codes 1111000 and 1111010, respectively. In my compressor, this is done without disturbing the other codes, while in Sega’s compressor this is not.
In a moment of serendipity, I tried sorting the data by hand by swapping each nybble with its destination. I swapped F-3 with 0-6, and 8-5 with 8-3, resulting in this:
Code 1110110  encodes nybble A of length 2 and was seen 19 times.
Code 11101110 encodes nybble 0 of length 6 and was seen 18 times.
Code 11101111 encodes nybble 8 of length 3 and was seen 16 times.
Code 1111000  encodes nybble F of length 3 and was seen 19 times.
Code 11110010 encodes nybble 7 of length 3 and was seen 17 times.
Code 11110011 encodes nybble D of length 2 and was seen 16 times.
Code 1111010  encodes nybble 8 of length 5 and was seen 19 times.
This exactly matched the Sega-compressed data!
I looked into various unstable sorting algorithms, searching for one that worked by swapping in this manner, and I found selection sort. After making my compressor sort its codes using this algorithm, I was delighted to see that the nybble runs were in the same order! I had finally cracked it!
Recompressing other data exposed a few bugs which were affecting accuracy, as well as some edge-cases that both compressors handled differently. For instance, when deciding whether to use XOR mode or not, Sega’s compressor would only compare the number of bytes used, rather than bits. When XOR mode and non-XOR mode use the exact same number of bytes, then non-XOR mode is preferred. Additionally, when performing its binary chop, the Fano code generator does not round when dividing by 2.
With these issues addressed, my compressor was able to perfectly recompress all Nemesis-compressed data in the first two Sonic the Hedgehog games!
And that brings us to now. My compressor is able to both mimic Sega’s compressor as well as surpass it. I have polished-up the code and released a Windows executable on GitHub. Being written in ANSI C (C89), I was able to compile it with Visual Studio 6, so it should run even on ancient versions of Windows. Hooray for portability.
A use-case for this compressor is Hivebrain’s Sonic 1 disassembly. Years ago, my accurate Kosinski compressor was integrated into it, allowing some of the game’s assets to be stored uncompressed. With my Nemesis compressor, this can finally be extended to the majority of the game’s assets!
With this compressor, my accurate Kosinski compressor, and the rediscovered original Saxman compressor, 3 out of 4 of the Sonic compression formats have accurate compressors! All that remains now is Enigma.
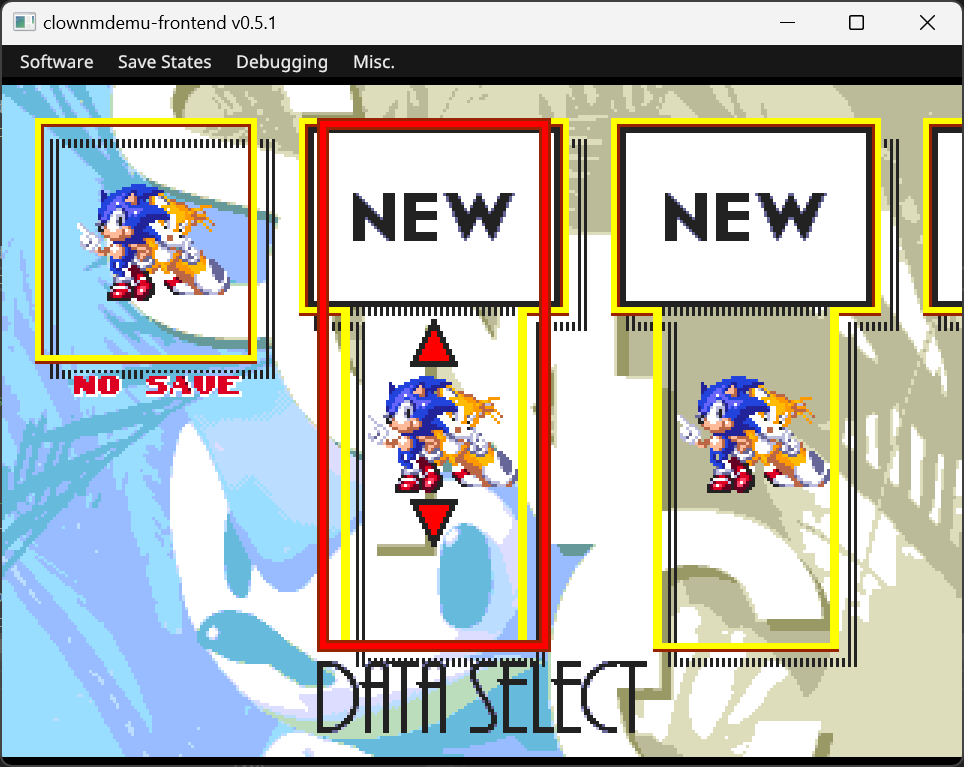
Fixes for Sonic 3’s Data Select and Sonic Crackers’ Title Cards
I have already covered this in another blog post, but for those not in the loop, the VDP emulation logic contained a few inaccuracies that caused visual corruption in a couple of Sonic games. These issues have now been addressed, allowing these games to work as they do on real Mega Drives.
Fix for Thunder Force IV’s Gradual Corruption
A user, Pinkerton, recently pointed out a very strange bug: the game Thunder Force IV would start off working fine, but gradually corrupt over time.
Not looking too bad……Oh dear.
This is unlike any bug that I have ever seen before in this emulator: games usually either work or they break completely – they do not slowly corrupt little by little whilst otherwise remaining completely stable.
An invaluable tip that Pinkerton provided was that the debug log kept mentioning the use of the ‘STOP’ instruction, which is a 68000 CPU instruction that was not yet emulated. I noticed that the Sega splash screen was playing at too fast a speed, so it was apparent that the screen was using the STOP instruction for controlling its framerate. The rest of the game played at the correct speed, and the debug log stopping complaining about the STOP instruction after this screen was over, so it was clear that only the Sega screen used the STOP instruction. Still, I figured it would be worth implementing the STOP instruction to get the screen working properly, then afterwards I could focus on the graphical corruption.
The STOP instruction is not used by the main Sonic games, so I am not very familiar with it, hence why it was not emulated. Upon researching it, I found that the instruction essentially causes the 68000 to cease processing instructions until an interrupt occurs. Given that there is an interrupt – Vertical Interrupt – that occurs once per frame, this instruction becomes a useful way of idling the CPU until the next frame. It would be unfortunate if no interrupts were set to occur, as the CPU would end up waiting forever, so the STOP instruction is also able to set which interrupts are enabled and disabled.
Implementing the STOP instruction only took a couple of minutes and a few lines of code, and, with that done, the Sega screen was running at the correct speed. Surprisingly, this also fixed the gradual graphical corruption in the game itself!
But how? The main game does not even use the STOP instruction! My guess is that the game relies on the STOP instructions in the Sega screen to set the interrupts to a sane configuration, and that, without it, the game would receive interrupts whilst performing sensitive operations like communicating with the VDP, causing said communication to be corrupted and leading to the graphics being broken.
Regardless, I am glad to have fixed the bug. Thunder Force IV was a game that I was meaning to try out sometime, so it’s nice that I can play it in my emulator.
Get Combat Cars, Micro Machines, Dynamite Heady, and Gunstar Heroes to Boot
For as long as my emulator has existed, it was unable to boot Combat Cars and Micro Machines, even after massive improvements in accuracy to both the 68000 and Z80 interpreters. This has always stumped me.
After informing me of the bug in Thunder Force IV, Pinkerton also noted that two Treasure titles – Dynamite Heady and Gunstar Heroes – failed to boot. With the new 68000 disassembler, I set about diagnosing the issue.
I was surprised to see that the games were stuck reading from the Z80 bus request register. To my knowledge, reading that register will provide a flag that indicates whether the bus request is in-progress or not. The Sonic games frequently wait for this flag to be clear. However, these Treasure games were different: they were waiting for the flag to be set instead. Because my emulator does not work like an actual Mega Drive, bus requests complete instantaneously, so the flag is never set. Because the flag is never set, the games wait indefinitely, resulting in their failure to boot.
Upon looking into the details of the bus request register, I discovered that I was wrong about what reading the register does: the flag provided does not indicate whether the request is in-progress, but rather whether the bus is held or released. What this means is that, if you’re releasing the bus, you wait for the flag to be set, and, if you’re requesting the bus, you wait for it to be clear.
With this inaccuracy corrected, Dynamite Heady and Gunstar Heroes now boot!
Not only that, but I later noticed that Combat Cars and Micro Machines finally boot too!
According to Pinkerton, this change gets Alien Soldier to boot as well!
Bonus: Struggling with Windows XP Compatibility
Going back to at least the second release of this emulator, I have tried to maintain compatibility with Windows XP. Why? Because I can, and because it was pretty convenient: the frontend’s main dependency, SDL2, supports Windows XP, and Visual Studio provides a (deprecated) toolchain for targeting Windows XP. I also figured that maintaining XP support was a good way of benchmarking the frontend’s portability: if it does not run on Windows XP, then what are the odds of it running on niche homebrew platforms?
Recently, I set up a Windows XP virtual machine just to test this emulator, so I could enjoy the satisfaction of seeing it running. I double-clicked the EXE and… it failed. No error messages at all; it just failed.
I did some research, and found that Visual Studio broke its Windows XP compatibility after version 16.4. This affects the runtime library, which I normally link statically. Switching to dynamic linkage and installing an older runtime library on Windows XP should bypass this issue, so I did just that. The emulator still crashed.
At this point, I considered Visual Studio to be a dead-end, and decided to switch to an open-source toolchain instead. MSYS2 would have been a good option, but it not only dropped support for Windows XP, but also Windows 7, so that would not work here.
That left one more option: Arch Linux’s MinGW-w64. Years ago, I used it to produce Windows XP-compatible builds of the Sonic 1 and 2 remasters. I rebooted into Linux, installed the appropriate packages, cross-compiled the emulator, copied the binary over to my virtual machine, double-clicked it, and… it failed.
This time was slightly different: the error message mentioned a missing DLL import, that being the function GetTickCount64, which was added in Windows Vista. This was a known issue with MinGW-w64’s libwinpthread. A recent commit from the end of 2023 should have fixed this, but it appears that this has not yet been released in an update. Fortunately, an Arch User Repository package is available for compiling the latest libwinpthread sources. With that done, I built a new binary and ran it. It still crashed.
Well, damn. Now what? At this point I was well and truly defeated, and gave up. Windows XP support with a modern toolchain is infeasible in 2024… or so I thought. Just this morning an idea occurred to me: what if SDL2 was failing to initialise because hardware acceleration was not available? VirtualBox no longer provides hardware acceleration to Windows XP guests, and SDL2 tries to create a hardware accelerated renderer before falling-back on its software renderer, so perhaps the emulator would work if I just forced SDL2 to skip hardware acceleration. To do this, I had to set the ‘SDL_RENDER_DRIVER’ environment variable to ‘Software’. After that was done, I ran the EXE and…
It works!
Unfortunately, this is not as convenient as compiling with Visual Studio on Windows, but I think that it is acceptable given that I already have to switch to Linux to compile the Emscripten port. This may be the very first release of the emulator whose pre-built EXE actually works on Windows XP! Though, that does not mean that the EXE will run badly on modern versions of Windows either: it will still support high-DPI displays and leverage newer Windows APIs like Direct3D 11 and WASAPI! That is the magic of SDL2 – dynamically bridging the gap between the program and the operating system’s underlying APIs!